2024-05-02

Renewing Let's Encrypt Certificates with NGINX Unit

Recently, I moved the DjangoTricks website and started PyBazaar on servers with Nginx Unit. One thing that was left undone was SSL certificate renewals. Let's Encrypt has special certbot parameters for renewing certificates for websites on Apache or Nginx servers, but they don't work out of the box with the Nginx Unit. In this blog post, I will tell you how to do that.

The certificate bundle

Nginx Unit doesn't use the fullchain.pem and privkey.pem generated by certbot directly from the location where they were generated. Instead, one has to create a bundle (like bundle1.pem) by concatenating them and then uploading it to the Nginx Unit configuration endpoint.

The bash script

For that, I created a bash script:

#!/usr/bin/env bash
SECONDS=0
CRON_LOG_FILE=/var/webapps/pybazaar/logs/renew_certificate.log

echo "=== Renewing Letsencrypt Certificate ===" > ${CRON_LOG_FILE}
date >> ${CRON_LOG_FILE}

echo "Renewing certificate..." >> ${CRON_LOG_FILE}
certbot --renew-by-default certonly -n --webroot -w /var/www/letsencrypt/ -m hello@pybazaar.com --agree-tos --no-verify-ssl -d pybazaar.com -d www.pybazaar.com

echo "Creating bundle..." >> ${CRON_LOG_FILE}
cat /etc/letsencrypt/live/pybazaar.com/fullchain.pem /etc/letsencrypt/live/pybazaar.com/privkey.pem > /var/webapps/pybazaar/unit-config/bundle1.pem

echo "Temporarily switching the Unit configuration to a dummy one..." >> ${CRON_LOG_FILE}
curl -X PUT --data-binary @/var/webapps/pybazaar/unit-config/unit-config-pre.json --unix-socket /var/run/control.unit.sock http://localhost/config

echo "Deleting old certificate from Nginx Unit..." >> ${CRON_LOG_FILE}
curl -X DELETE --unix-socket /var/run/control.unit.sock http://localhost/certificates/certbot1

echo "Installing new certificate to Nginx Unit..." >> ${CRON_LOG_FILE}
curl -X PUT --data-binary @/var/webapps/pybazaar/unit-config/bundle1.pem --unix-socket /var/run/control.unit.sock http://localhost/certificates/certbot1

echo "Switching the Unit configuration to the correct one..." >> ${CRON_LOG_FILE}
curl -X PUT --data-binary @/var/webapps/pybazaar/unit-config/unit-config.json --unix-socket /var/run/control.unit.sock http://localhost/config

echo "Finished." >> ${CRON_LOG_FILE}
duration=$SECONDS
echo "$(($duration / 60)) minutes and $(($duration % 60)) seconds elapsed." >> ${CRON_LOG_FILE}

Once you have adapted the script, you can run it manually as a root user to test it:

$ chmod +x renew_certificate.sh
$ ./renew_certificate.sh

Note that the certbot command will try to validate your website's URL by attempting to reach a temporary file that it will create on http://example.com/.well-known/acme-challenge/, so make sure that this location is accessible and serving the static files.

For more details about the Nginx Unit, check my previous blog post.

The cron job

If everything works as expected, you can add it to the root user's cron jobs to be executed weekly.

Export the current root cron jobs to a crontab.txt:

$ crontab -l > crontab.txt

Then edit it and add the weekly script to update the SSL certificate:

PATH=/usr/local/sbin:/usr/local/bin:/usr/sbin:/usr/bin:/sbin:/bin:/snap/bin
SHELL=/bin/bash
MAILTO=""
@weekly /var/webapps/pybazaar/unit-config/renew_certificate.sh

Then run the following as the root user to apply it:

$ crontab crontab.txt

The good thing about not editing the cron job with crontab -e is that you can choose the editor and even put the crontab.txt under Git version control.

Happy web development with WSGI or ASGI!


Cover picture by Gotta Be Worth It

2024-05-01

Generating Fake Django Model Instances with Factory Boy

As you might know, I am developing PyBazaar, a Python Developer Marketplace. For a project of that scope, I need to create hundreds or thousands of data entries to ensure that everything works as expected. Factory Boy is a tool that allows me to create model instances in batches, and this blog post is about it.

The benefits of using Factory Boy

By creating a bunch of fake entries, I can achieve the following:

  • Work on list and detail representation and styling.
  • Work on and try functionality like filters, sorting, and pagination.
  • Check and improve performance with loads of data entries.
  • Create dummy data for unit or functional tests.

Factory Boy seemed like a pretty complex package, so I want to simplify things and introduce you to all the necessary parts for creating a fake model instances.

Model preparation

At PyBazaar, I have users with profiles, job offers, and resources that can be faked in batch. The related categories are predefined and don't need to be faked.

To make it possible to distinguish between real and fake entries, I added a new boolean field is_fake to all those models that I can create in batch:

# For testing and debugging
is_fake = models.BooleanField(_("Fake"), default=False)

Here is what the list of profiles can look like when created with Factory Boy:

The setup

The installation is pretty straightforward:

(venv)$ pip install factory-boy==3.3.0

And then in each app where you need to create fake entries, create a file factories.py with factory classes, e.g.:

import random
import factory
from pybazaar.apps.accounts.models import User

class UserFactory(factory.django.DjangoModelFactory):
    class Meta:
        model = User

    first_name = factory.Faker("first_name")
    last_name = factory.Faker("last_name")
    
    # ...
    
    is_fake = True

For factory classes, I also add custom class methods delete_fake() and recreate_batch() so that I can quickly create entries or delete them:

class ProfileFactory(factory.django.DjangoModelFactory):
    class Meta:
        model = Profile

    user = factory.SubFactory(UserFactory)

    # ...
        
    is_fake = True

    @classmethod
    def recreate_batch(cls, size, **kwargs):
        cls.delete_fake()
        cls.create_batch(size=size, **kwargs)

    @classmethod
    def delete_fake(cls):
        for profile in Profile.objects.filter(is_fake=True):
            profile.delete()
        for user in User.objects.filter(is_fake=True):
            user.delete()

Factory class attributes tell the system what values to assign to the models when creating instances. Let's explore multiple cases that we can use as values.

Assigning a static value

If it's a simple static value, you can just assign it. It will be the same for all fake entries:

is_fake = True
publishing_status = Profile.PublishingStatusChoices.PUBLISHED

Assigning a value from a list

If it's a value from a list, use the Iterator class:

title = factory.Iterator([
    "Developer",
    "Software Engineer",
    "Programmer",
])

experience_level = factory.Iterator(
    Profile.ExperienceLevelChoices.values
)

Assigning generated value of a certain type

Factory Boy uses the Faker package to allow the creating of fake names, paragraphs, or locations. You can use those as follows:

first_name = factory.Faker("first_name")
last_name = factory.Faker("last_name")
summary = factory.Faker("paragraph")
city = factory.Faker("city")
state = factory.Faker("state")
country = factory.Faker("country_code")

Assigning an instance

If it's a foreign key and you want a random value, use this:

resource_type = factory.LazyAttribute(
    lambda o: ResourceType.objects.order_by("?").first()
)

Assigning a value from a function

Similarly, you can assign a value from a function:

description = factory.LazyAttribute(
    lambda o: generate_quill_content()
)

Assigning a random value

Or a random value:

is_available_for_work = factory.LazyAttribute(
    lambda o: random.choice([True, False])
)

Assigning a value based on attributes or methods of the model instance

Once you define attributes like first_name or last_name, you can set other values depending on those:

username = factory.LazyAttribute(
    lambda o: f"{o.first_name}_{o.last_name}".lower()
)
email = factory.LazyAttribute(
    lambda o: f"{o.first_name}_{o.last_name}@example.com".lower()
)

Assigning a password

There is a special django.Password class for generating password values:

password = factory.django.Password("Pa$$w0rd")

Assigning dummy images

Here is how to create and assign a dummy single-color image:

avatar = factory.django.ImageField(
    width=200, height=200, color="rgb(2,132,199)"
)

Having two factories depending on each other

As we have profiles depending on users, we can define the codependence with SubFactory class.

class ProfileFactory(factory.django.DjangoModelFactory):
    class Meta:
        model = Profile

    user = factory.SubFactory(UserFactory)

Then, when creating profiles, the users will be created automatically for them, too.

Attaching many-to-many relations

In Django, many-to-many relationships must be added after creating a model instance. We can achieve that with the PostGeneration class:

def attach_categories(obj, create, extracted, **kwargs):
    obj.specializations.add(
        *list(Specialization.objects.order_by("?")[: random.randint(3, 7)])
    )

class ProfileFactory(factory.django.DjangoModelFactory):
    # ...
    do_afterwards = factory.PostGeneration(attach_categories)

How you call this attribute doesn't matter - it should just not clash with other field names or attributes.

A complete example

So the final factories.py file could look like this:

import random
import factory
import json
from pybazaar.apps.accounts.models import User
from pybazaar.apps.profiles.models import Profile
from pybazaar.apps.categories.models import Specialization

class UserFactory(factory.django.DjangoModelFactory):
    class Meta:
        model = User

    first_name = factory.Faker("first_name")
    last_name = factory.Faker("last_name")
    username = factory.LazyAttribute(
        lambda o: f"{o.first_name}_{o.last_name}".lower()
    )
    email = factory.LazyAttribute(
        lambda o: f"{o.first_name}_{o.last_name}@example.com".lower()
    )
    password = factory.django.Password("Pa$$w0rd")
    is_fake = True

def generate_quill_content():
    return json.dumps(
        {
            "delta": '',
            "html": "<p>Hey there</p>",
        }
    )

def attach_categories(obj, create, extracted, **kwargs):
    obj.specializations.add(
        *list(Specialization.objects.order_by("?")[: random.randint(3, 7)])
    )

class ProfileFactory(factory.django.DjangoModelFactory):
    class Meta:
        model = Profile

    user = factory.SubFactory(UserFactory)
    title = factory.Iterator(
        [
            "Developer",
            "Software Engineer",
            "Programmer",
        ]
    )
    avatar = factory.django.ImageField(
        width=200, height=200, color="rgb(2,132,199)"
    )
    bio = factory.LazyAttribute(lambda o: generate_quill_content())
    city = factory.Faker("city")
    state = factory.Faker("state")
    country = factory.Faker("country_code")
    is_available_for_work = factory.LazyAttribute(
        lambda o: random.choice([True, False])
    )
    experience_level = factory.Iterator(
        Profile.ExperienceLevelChoices.values
    )
    publishing_status = Profile.PublishingStatusChoices.PUBLISHED
    is_fake = True

    do_afterwards = factory.PostGeneration(attach_categories)

    @classmethod
    def recreate_batch(cls, size, **kwargs):
        cls.delete_fake()
        cls.create_batch(size=size, **kwargs)

    @classmethod
    def delete_fake(cls):
        for profile in Profile.objects.filter(is_fake=True):
            profile.delete()
        for user in User.objects.filter(is_fake=True):
            user.delete()

Creating fake entries

Lastly, I can create the fake entries from the Django shell as follows:

>>> from pybazaar.apps.profiles.factories import ProfileFactory
>>> ProfileFactory.recreate_batch(100)

And later, when I don't need those anymore:

>>> from pybazaar.apps.profiles.factories import ProfileFactory
>>> ProfileFactory.delete_fake()

Whenever I add new fields to the models, I can easily tweak the factories and recreate the whole bunch of models in one step.

Final words

Factory Boy doesn't guarantee data validation and integrity. For example, city, state, and country will be three separate random values that don't match a real location. However, that is sufficient to test your website's basic look and feel or performance.


Cover image by Google DeepMind

2024-02-24

Django Project on NGINX Unit

Django Project on NGINX Unit

Recently, I learned about the NGINX Unit and decided to try it on my DjangoTricks website. Unit is a web server developed by people from NGINX, with pluggable support for Python (WSGI and ASGI), Ruby, Node.js, PHP, and a few other languages. I wanted to see whether it's really easy to set it up, have it locally on my Mac and the remote Ubuntu server, and try out the ASGI features of Django, allowing real-time communication. Also, I wanted to see whether Django is faster with Unit than with NGINX and Gunicorn. This article is about my findings.

My observations

Unit service uses HTTP requests to read and update its configuration. The configuration is a single JSON file that you can upload to the Unit service via a command line from the same computer or modify its values by keys in the JSON structure.

Normally, the docs suggest using the curl command to update the configuration. However, as I am using Ansible to deploy my Django websites, I wanted to create a script I could later copy to other projects. I used Google Gemini to convert bash commands from the documentation to Ansible directives and corrected its mistakes.

The trickiest part for me was to figure out how to use Let's Encrypt certificates in the simplest way possible. The docs are extensive and comprehensible, but sometimes, they dig into technical details that are unnecessary for a common Django developer.

Also, it's worth mentioning that the Unit plugin version must match your Python version in the virtual environment. It was unexpected for me when Brew installed Python 3.12 with unit-python3 and then required my project to use Python 3.12 instead of Python 3.10 (which I used for the DjangoTricks website). So I had to recreate my virtual environment and probably will have problems later with pip-compile-multi when I prepare packages for the production server, still running Python 3.10.

Below are the instructions I used to set up the NGINX Unit with my existing DjangoTricks website on Ubuntu 22.04. For simplicity, I am writing plain Terminal commands instead of analogous Ansible directives.

1. Install Unit service to your server

Follow the installation instructions from documentation to install unit, unit-dev, unit-python3.10, and whatever other plugins you want. Make sure the service is running.

2. Prepare Let's Encrypt certificates

Create a temporary JSON configuration file /var/webapps/djangotricks/unit-config/unit-config-pre.json, which will allow Let's Encrypt certbot to access the .well-known directory for domain confirmation:

{
  "listeners": {
    "*:80": {
      "pass": "routes/acme"
    }
  },
  "routes": {
    "acme": [
      {
        "match": {
          "uri": "/.well-known/acme-challenge/*"
        },
        "action": {
          "share": "/var/www/letsencrypt/$uri"
        }
      }
    ]
  }
}

Install it to Unit:

$ curl -X PUT --data-binary @/var/webapps/djangotricks/unit-config/unit-config-pre.json \
--unix-socket /var/run/control.unit.sock http://localhost/config

If you make any mistakes in the configuration, it will be rejected with an error message and not executed.

Create Let's Encrypt certificates:

$ certbot certonly -n --webroot -w /var/www/letsencrypt/ -m hello@djangotricks.com \
--agree-tos --no-verify-ssl -d djangotricks.com -d www.djangotricks.com

Create a bundle that is required by the NGINX Unit:

cat /etc/letsencrypt/live/djangotricks.com/fullchain.pem \
/etc/letsencrypt/live/djangotricks.com/privkey.pem > \
/var/webapps/djangotricks/unit-config/bundle1.pem

Install certificate to NGINX Unit as certbot1:

curl -X PUT --data-binary @/var/webapps/djangotricks/unit-config/bundle1.pem \
--unix-socket /var/run/control.unit.sock http://localhost/certificates/certbot1

3. Install Django project configuration

Create a JSON configuration file /var/webapps/djangotricks/unit-config/unit-config.json which will use your SSL certificate and will serve your Django project:

{
  "listeners": {
    "*:80": {
      "pass": "routes/main"
    },
    "*:443": {
      "pass": "routes/main",
      "tls": {
        "certificate": "certbot1"
      }
    }
  },
  "routes": {
    "main": [
      {
        "match": {
          "host": [
            "djangotricks.com",
            "www.djangotricks.com"
          ],
          "uri": "/.well-known/acme-challenge/*"
        },
        "action": {
          "share": "/var/www/letsencrypt/$uri"
        }
      },
      {
        "match": {
          "host": [
            "djangotricks.com",
            "www.djangotricks.com"
          ],
        },
        "action": {
          "pass": "applications/django"
        }
      },
      {
        "action": {
          "return": 444
        }
      }
    ]
  },
  "applications": {
    "django": {
      "type": "python",
      "path": "/var/webapps/djangotricks/project/djangotricks",
      "home": "/var/webapps/djangotricks/venv/",
      "module": "djangotricks.wsgi",
      "environment": {
        "DJANGO_SETTINGS_MODULE": "djangotricks.settings.production"
      },
      "user": "djangotricks",
      "group": "users"
    }
  }
}

In this configuration, HTTP requests can only be used for certification validation, and HTTPS requests point to the Django project if the domain used is correct. In other cases, the status "444 - No Response" is returned. (It's for preventing access for hackers who point their domains to your IP address).

In the NGINX Unit, switching between WSGI and ASGI is literally a matter of changing one letter from "w" to "a" in the line about the Django application module, from:

"module": "djangotricks.wsgi",

to:

"module": "djangotricks.asgi",

I could have easily served the static files in this configuration here, too, but my STATIC_URL contains a dynamic part to force retrieval of new files from the server instead of the browser cache. So, I used WhiteNoise to serve the static files.

For redirection from djangotricks.com to www.djangotricks.com, I also chose to use PREPEND_WWW = True setting instead of Unit directives.

And here, finally, installing it to Unit (it will overwrite the previous configuration):

$ curl -X PUT --data-binary @/var/webapps/djangotricks/unit-config/unit-config.json \
--unix-socket /var/run/control.unit.sock http://localhost/config

How it performed

DjangoTricks is a pretty small website; therefore, I couldn't do extensive benchmarks, but I checked two cases: how a filtered list view performs with NGINX and Gunicorn vs. NGINX Unit, and how you can replace NGINX, Gunicorn, and Huey background tasks with ASGI requests using NGINX Unit.

First of all, the https://www.djangotricks.com/tricks/?categories=development&technologies=django-4-2 returned the HTML result on average in 139 ms on NGINX with Gunicorn, whereas it was on average 140 ms with NGINX Unit using WSGI and 149 ms with NGINX Unit using ASGI. So, the NGINX Unit with WSGI is 0.72% slower than NGINX with Gunicorn, and the NGINX Unit with ASGI is 7.19% slower than NGINX with Gunicorn.

However, when I checked https://www.djangotricks.com/detect-django-version/ how it performs with background tasks and continuous Ajax requests until the result is retrieved vs. asynchronous checking using ASGI, I went on average from 6.62 s to 0.75 s. Of course, it depends on the timeout of the continuous Ajax request, but generally, a real-time ASGI setup can improve the user experience significantly.

Final words

Although NGINX Unit with Python is slightly (unnoticeably) slower than NGINX with Gunicorn, it allows Django developers to use asynchronous requests and implement real-time user experience. Also, you could probably have a Django website and Matomo analytics or WordPress blog on the same server. The NGINX Unit configuration is relatively easy to understand, and you can script the process for reusability.


Cover Image by Volker Meyer.

2022-10-21

How to Handle Django Forms within Modal Dialogs

How to Handle Django Forms within Modal Dialogs

I like django-crispy-forms. You can use it for stylish uniform HTML forms with Bootstrap, TailwindCSS, or even your custom template pack. But when it comes to custom widgets and dynamic form handling, it was always a challenge. Recently I discovered htmx. It's a JavaScript framework that handles Ajax communication based on custom HTML attributes. In this article, I will explore how you can use django-crispy-forms with htmx to provide a form with server-side validation in a modal dialog.

The setup

For this experiment, I will be using these PyPI packages:

  • Django - my beloved Python web framework.
  • django-crispy-forms - library for stylized forms.
  • crispy-bootstrap5 - Bootstrap 5 template pack for django-crispy-forms.
  • django-htmx - some handy htmx helpers for Django projects.

Also, I will use the CDN versions of Bootstrap5 and htmx.

The form

I decided to add some crispy style to the login form by extending Django's authentication form and attaching a crispy helper to it.

from django.contrib.auth.forms import AuthenticationForm
from crispy_forms.helper import FormHelper
from crispy_forms.layout import Layout
from crispy_bootstrap5 import bootstrap5


class LoginForm(AuthenticationForm):
    def __init__(self, *args, **kwargs):
        super().__init__(*args, **kwargs)

        self.helper = FormHelper()
        self.helper.form_tag = False
        self.helper.include_media = False
        self.helper.layout = Layout(
            bootstrap5.FloatingField("username", autocomplete="username"),
            bootstrap5.FloatingField("password", autocomplete="current-password"),
        )

Here I set form_tag to False to skip the <form> tag from the rendered form elements because I want to customize it in the templates. And I set include_media to False because I want to manually handle the media inclusion, as you will see later, instead of automatically including them in the form.

The views

I will have two views:

  • The home view will have a button to open a modal dialog for login.
  • The login form view will handle the form and return the HTML markup for the dialog.
from django.shortcuts import render, redirect
from django.contrib.auth import login as auth_login, logout as auth_logout
from django_htmx.http import HttpResponseClientRefresh
from .forms import LoginForm


def home(request):
    if request.user.is_authenticated:
        return render(request, "dashboard.html")
    return render(request, "home.html", context)


def login(request):
    if request.method == "POST":
        form = LoginForm(request=request, data=request.POST, prefix="login")
        template_name = "login_form.html"
        if form.is_valid():
            user = form.get_user()
            auth_login(request, user)
            return HttpResponseClientRefresh()
    else:
        form = LoginForm(request=request, prefix="login")
        template_name = "login_dialog.html"
    context = {"form": form}
    return render(request, template_name, context)

The home view just returns different templates based on whether the user is logged in or not.

The login view handles a login form and renders different templates based on whether the view was accessed by GET or POST method. If the login succeeds, a special HttpResponseClientRefresh response is returned, which tells htmx to refresh the page from where the login form was loaded and submitted. It's an empty response with the HX-Refresh: true header.

Then I plug those two views into my urls.py rules.

The templates and javascript

At the end of the base.html template, I include htmx from CDN and my custom dialog.js:

<script src="https://unpkg.com/htmx.org@1.8.2" integrity="sha384-+8ISc/waZcRdXCLxVgbsLzay31nCdyZXQxnsUy++HJzJliTzxKWr0m1cIEMyUzQu" crossorigin="anonymous"></script>
<script src="{% static 'js/dialog.js' %}"></script>

In the home.html template, I add a button which will open the dialog:

<button
    data-hx-get="{% url 'login' %}"
    data-hx-target="main"
    data-hx-swap="beforeend"
    type="button"
    class="btn btn-primary"
>Log in</button>

Note that htmx allows either hx-* syntax or data-hx-* for its HTML attributes and I prefer the latter because data-* attributes make a valid HTML document.

In the snippet above, I tell htmx to load the login page on the button click and insert it before the end of the <main> HTML tag.

Let's have a look at my dialog.js file:

function init_widgets_for_htmx_element(target) {
    // init other widgets

    // init modal dialogs
    if (target.tagName === 'DIALOG') {
        target.showModal();
        htmx.on('.close-dialog', 'click', function(event) {
            var dialog = htmx.find('dialog[open]');
            dialog.close();
            htmx.remove(dialog);
        });
    }
}

htmx.onLoad(init_widgets_for_htmx_element);

Here, when a page loads or a htmx inserts a snippet, the init_widgets_for_htmx_element function will be called with the <body> or the inserted element as the target. One can use this function to initialize widgets, such as rich text fields, autocompletes, tabs, custom frontend validators, etc. Also, I use this function to open the loaded modal dialogs and add event handlers to close them.

Now the login_dialog.html template looks like this (I just stripped the styling markup):

<dialog id="htmx-dialog">
    <h1>Login</h1>
    <button type="button" class="close-dialog btn-close" aria-label="Close"></button>
    {% include "login_form.html" %}
    <button type="submit" form="htmx-dialog-form">Log in</button>
</dialog>

And the login_form.html looks like this:

<form
    id="htmx-dialog-form"
    novalidate
    data-hx-post="{% url 'login' %}"
    data-hx-swap="outerHTML"
>
    {% load crispy_forms_tags %}
    {% crispy form %}
</form>

The htmx attributes tell htmx to submit the form data to the login view by Ajax and replace the <form> HTML tag with the response received. That is used for form validation. If the response has the HX-Refresh: true header, as mentioned before, then the home page is refreshed.

Here is what the result looks like:

Validated form within a modal dialog

The form media

If you noticed before, we excluded the media from the form. Otherwise, the home page would load the media of its own forms (for example, a search form) and the media of the dialog forms. And that would cause double executions of shared scripts, for example, the ones for autocompletes and rich text fields.

You can nicely combine media from different forms by concatenating the media instances. This way, each CSS and Javascript file is included just once.

As the login form isn't part of the home page but instead included on demand, I need to have its media in the home view or any other view where the login button is shown.

Here comes this custom context processor for help:

def login_dialog(request):
    from .forms import LoginForm

    if not request.user.is_authenticated:
        form = LoginForm(request=request)
        if hasattr(request, "combined_media"):
            request.combined_media += form.media
        else:
            request.combined_media = form.media
    return {}

It checks for any request.combined_media and attaches the form media from the login form.

Lastly, I attach this context processor to the template settings and render the value of combined media before </body>:

{{ request.combined_media }}

The final words

Get the code to play with from Github. As you can see, htmx makes Ajax communications pretty straightforward, even when it's about dynamically loading and reloading parts of the content or initializing custom widgets.


Cover photo by Pixabay

2022-10-04

How to Rename a Django App

When I initially created my MVP (minimal viable product) for 1st things 1st, I considered the whole Django project to be about prioritization. After a few years, I realized that the Django project is about SaaS (software as a service), and prioritization is just a part of all functionalities necessary for a SaaS to function. I ended up needing to rename apps to have clean and better-organized code. Here is how I did that.

0. Get your code and database up to date

Ensure you have the latest git pull and execute all database migrations.

1. Install django-rename-app

Put django-rename-app into pip requirements and install them or just run:

(venv)$ pip install django-rename-app

Put the app into INSTALLED_APPS in your settings:

INSTALLED_APPS = [
    # …
    "django_rename_app",
]

2. Rename the app directories

Rename the oldapp as newapp in your apps and templates.

3. Rename the app name occurrences in the code

Rename the app in all your imports, relations, migrations, and template paths.

You can do a global search for oldapp and then check case by case where you need to rename that term to newapp, and where not.

4. Run the management command rename_app

Run the management command rename_app:

(env)$ python manage.py rename_app oldapp newapp

This command renames the app prefix the app tables and the records in django_content_type and django_migrations tables.

If you plan to update staging or production servers, add the rename_app command before running migrations in your deployment scripts (Ansible, Docker, etc.)

5. Update indexes and constraints

Lastly, create an empty database migration for the app with custom code to update indexes and foreign-key constraints.

(env)$ python manage.py makemigrations newapp --empty --name rename_indexes

Fill the migration with the following code:

# newapp/migrations/0002_rename_indexes.py
from django.db import migrations


def named_tuple_fetch_all(cursor):
    "Return all rows from a cursor as a namedtuple"
    from collections import namedtuple

    desc = cursor.description
    Result = namedtuple("Result", [col[0] for col in desc])
    return [Result(*row) for row in cursor.fetchall()]


def rename_indexes(apps, schema_editor):
    from django.db import connection

    with connection.cursor() as cursor:
        cursor.execute(
            """SELECT indexname FROM pg_indexes 
            WHERE tablename LIKE 'newapp%'"""
        )
        for result in named_tuple_fetch_all(cursor):
            old_index_name = result.indexname
            new_index_name = old_index_name.replace(
                "oldapp_", "newapp_", 1
            )
            cursor.execute(
                f"""ALTER INDEX IF EXISTS {old_index_name} 
                RENAME TO {new_index_name}"""
            )


def rename_foreignkeys(apps, schema_editor):
    from django.db import connection

    with connection.cursor() as cursor:
        cursor.execute(
            """SELECT table_name, constraint_name 
            FROM information_schema.key_column_usage
            WHERE constraint_catalog=CURRENT_CATALOG 
            AND table_name LIKE 'newapp%'
            AND position_in_unique_constraint notnull"""
        )
        for result in named_tuple_fetch_all(cursor):
            table_name = result.table_name
            old_foreignkey_name = result.constraint_name
            new_foreignkey_name = old_foreignkey_name.replace(
                "oldapp_", "newapp_", 1
            )
            cursor.execute(
                f"""ALTER TABLE {table_name} 
                RENAME CONSTRAINT {old_foreignkey_name} 
                TO {new_foreignkey_name}"""
            )


class Migration(migrations.Migration):

    dependencies = [
        ("newapp", "0001_initial"),
    ]

    operations = [
        migrations.RunPython(rename_indexes, migrations.RunPython.noop),
        migrations.RunPython(rename_foreignkeys, migrations.RunPython.noop),
    ]

Run the migrations:

(env)$ python manage.py migrate

If something doesn't work as wanted, migrate back, fix the code, and migrate again. You can unmigrate by migrating to one step before the last migration, for example:

(env)$ python manage.py migrate 0001

6. Cleanup

After applying the migration in all necessary environments, you can clean them up by removing django-rename-app from your pip requirements and deployment scripts.

Final words

It's rarely possible to build a system that meets all your needs from the beginning. Proper systems always require continuous improvement and refactoring. Using a combination of Django migrations and django-rename-app, you can work on your websites in an Agile, clean, and flexible way.

Happy coding!


Cover photo by freestocks.

2022-04-18

How I Integrated Zapier into my Django Project

As you might know, I have been developing, providing, and supporting the prioritization tool 1st things 1st. One of the essential features to implement was exporting calculated priorities to other productivity tools. Usually, building an export from one app to another takes 1-2 weeks for me. But this time, I decided to go a better route and use Zapier to export priorities to almost all possible apps in a similar amount of time. Whaaat!?? In this article, I will tell you how.

What is Zapier and how it works?

The no-code tool Zapier takes input from a wide variety of web apps and outputs it to many other apps. Optionally you can filter the input based on conditions. Or format the input differently (for example, convert HTML to Markdown). In addition, you can stack the output actions one after the other. Usually, people use 2-3 steps for their automation, but there are power users who create 50-step workflows.

The input is managed by Zapier's triggers. The output is controlled by Zapier's actions. These can be configured at the website UI or using a command-line tool. I used the UI as this was my first integration. Trigger events accept a JSON feed of objects with unique IDs. Each new item there is treated as a new input item. With a free tier, the triggers are checked every 15 minutes. Multiple triggers are handled in parallel, and the sorting order of execution is not guaranteed. As it is crucial to have the sorting order correct for 1st things 1st priorities, people from Zapier support suggested providing each priority with a 1-minute interval to make sure the priorities get listed in the target app sequentially.

The most challenging part of Zapier integration was setting up OAuth 2.0 provider. Even though I used a third-party Django app django-oauth-toolkit for that. Zapier accepts other authentication options too, but this one is the least demanding for the end-users.

Authentication

OAuth 2.0 allows users of one application to use specific data of another application while keeping private information private. You might have used the OAuth 2.0 client directly or via a wrapper for connecting to Twitter apps. For Zapier, one has to set OAuth 2.0 provider.

The official tutorial for setting up OAuth 2.0 provider with django-oauth-toolkit is a good start. However, one problem with it is that by default, any registered user can create OAuth 2.0 applications at your Django website, where in reality, you need just one global application.

First of all, I wanted to allow OAuth 2.0 application creation only for superusers.

For that, I created a new Django app oauth2_provider_adjustments with modified views and URLs to use instead of the ones from django-oauth-toolkit.

The views related to OAuth 2.0 app creation extended this SuperUserOnlyMixin instead of LoginRequiredMixin:

from django.contrib.auth.mixins import AccessMixin

class SuperUserOnlyMixin(AccessMixin):
    def dispatch(self, request, *args, **kwargs):
        if not request.user.is_superuser:
            return self.handle_no_permission()
        return super().dispatch(request, *args, **kwargs)

Then I replaced the default oauth2_provider URLs:

urlpatterns = [
    # …
    path("o/", include("oauth2_provider.urls", namespace="oauth2_provider")),
]

with my custom ones:

urlpatterns = [
    # …
    path("o/", include("oauth2_provider_adjustments.urls", namespace="oauth2_provider")),
]

I set the new OAuth 2.0 application by going to /o/applications/register/ and filling in this info:

Name: Zapier
Client type: Confidential
Authorization grant type: Authorization code
Redirect uris: https://zapier.com/dashboard/auth/oauth/return/1stThings1stCLIAPI/ (copied from Zapier)
Algorithm: No OIDC support

If you have some expertise in the setup choices and see any flaws, let me know.

Zapier requires creating a test view that will return anything to check if there are no errors authenticating a user with OAuth 2.0. So I made a simple JSON view like this:

from django.http.response import JsonResponse


def user_info(request, *args, **kwargs):
    if not request.user.is_authenticated:
        return JsonResponse(
            {
                "error": "User not authenticated",
            },
            status=200,
        )
    return JsonResponse(
        {
            "first_name": request.user.first_name,
            "last_name": request.user.last_name,
        },
        status=200,
    )

Also, I had to have login and registration views for those cases when the user's session was not present.

Lastly, at Zapier, I had to set these values for OAuth 2.0:

Client ID: The Client ID from registered app
Client Secret: The Client Secret from registered app

Authorization URL: https://apps.1st-things-1st.com/o/authorize/
Scope: read write
Access Token Request: https://apps.1st-things-1st.com/o/token/
Refresh Token Request: https://apps.1st-things-1st.com/o/token/
I want to automatically refresh on unauthorized error: Checked
Test: https://apps.1st-things-1st.com/user-info/
Connection Label: {{first_name}} {{last_name}}

Trigger implementation

There are two types of triggers in Zapier:

  • (A) Ones for providing new things to other apps, for example, sending priorities from 1st things 1st to other productivity apps.
  • (B) Ones for listing things in drop boxes at the former triggers, for example, letting Zapier users choose the 1st things 1st project from which to import priorities.

The feeds for triggers should (ideally) be paginated. But without meta information for the item count, page number, following page URL, etc., you would usually have with django-rest-framework or other REST frameworks. Provide only an array of objects with unique IDs for each page. The only field name that matters is "id" – others can be anything. Here is an example:

[
    {
        "id": "39T7NsgQarYf",
        "project": "5xPrQbPZNvJv",
        "title": "01. Custom landing pages for several project types (83%)",
        "plain_title": "Custom landing pages for several project types",
        "description": "",
        "score": 83,
        "priority": 1,
        "category": "Choose"
    },
    {
        "id": "4wBSgq3spS49",
        "project": "5xPrQbPZNvJv",
        "title": "02. Zapier integration (79%)",
        "plain_title": "Zapier integration",
        "description": "",
        "score": 79,
        "priority": 2,
        "category": "Choose"
    },
    {
        "id": "6WvwwB7QAnVS",
        "project": "5xPrQbPZNvJv",
        "title": "03. Electron.js desktop app for several project types (42%)",
        "plain_title": "Electron.js desktop app for several project types",
        "description": "",
        "score": 41,
        "priority": 3,
        "category": "Consider"
    }
]

The feeds should list items in reverse order for the (A) type of triggers: the newest things go at the beginning. The pagination is only used to cut the number of items: the second and further pages of the paginated list are ignored by Zapier.

In my specific case of priorities, the order matters, and no items should be lost in the void. So I listed the priorities sequentially (not newest first) and set the number of items per page unrealistically high so that you basically get all the things on the first page of the feed.

The feeds for the triggers of (B) type are normally paginated from the first page until the page returns empty results. The order should be alphabetical, chronological, or by sorting order field, whatever makes sense. There you need just two fields, the ID and the title of the item (but more fields are allowed too), for example:

[
    {
        "id": "5xPrQbPZNvJv",
        "title": "1st things 1st",
        "owner": "Aidas Bendoraitis"
    },
    {
        "id": "VEXGzThxL6Sr",
        "title": "Make Impact",
        "owner": "Aidas Bendoraitis"
    },
    {
        "id": "WoqQbuhdUHGF",
        "title": "DjangoTricks website",
        "owner": "Aidas Bendoraitis"
    },
]

I used django-rest-framework to implement the API because of the batteries included, such as browsable API, permissions, serialization, pagination, etc.

For the specific Zapier requirements, I had to write a custom pagination class, SimplePagination, to use with my API lists. It did two things: omitted the meta section and showed an empty list instead of a 404 error for pages that didn't have any results:

from django.core.paginator import InvalidPage

from rest_framework.pagination import PageNumberPagination
from rest_framework.response import Response


class SimplePagination(PageNumberPagination):
    page_size = 20

    def get_paginated_response(self, data):
        return Response(data)  # <-- Simple pagination without meta

    def get_paginated_response_schema(self, schema):
        return schema  # <-- Simple pagination without meta

    def paginate_queryset(self, queryset, request, view=None):
        """
        Paginate a queryset if required, either returning a
        page object, or `None` if pagination is not configured for this view.
        """
        page_size = self.get_page_size(request)
        if not page_size:
            return None

        paginator = self.django_paginator_class(queryset, page_size)
        page_number = self.get_page_number(request, paginator)

        try:
            self.page = paginator.page(page_number)
        except InvalidPage as exc:
            msg = self.invalid_page_message.format(
                page_number=page_number, message=str(exc)
            )
            return []  # <-- If no items found, don't raise NotFound error

        if paginator.num_pages > 1 and self.template is not None:
            # The browsable API should display pagination controls.
            self.display_page_controls = True

        self.request = request
        return list(self.page)

To preserve the order of items, I had to make the priorities appear one by one at 1-minute intervals. I did that by having a Boolean field exported_to_zapier at the priorities. The API showed priorities only if that field was set to True, which wasn't the case by default. Then, background tasks were scheduled 1 minute after each other, triggered by a button click at 1st things 1st, which set the exported_to_zapier to True for each next priority. I was using huey, but the same can be achieved with Celery, cron jobs, or other background task manager:

# zapier_api/tasks.py
from django.conf import settings
from django.utils.translation import gettext
from huey.contrib.djhuey import db_task


@db_task()
def export_next_initiative_to_zapier(project_id):
    from evaluations.models import Initiative

    next_initiatives = Initiative.objects.filter(
        project__pk=project_id,
        exported_to_zapier=False,
    ).order_by("-total_weight", "order")
    count = next_initiatives.count()
    if count > 0:
        next_initiative = next_initiatives.first()
        next_initiative.exported_to_zapier = True
        next_initiative.save(update_fields=["exported_to_zapier"])

        if count > 1:
            result = export_next_initiative_to_zapier.schedule(
                kwargs={"project_id": project_id},
                delay=settings.ZAPIER_EXPORT_DELAY,
            )
            result(blocking=False)

One gotcha: Zapier starts pagination from 0, whereas django-rest-framework starts pagination from 1. To make them work together, I had to modify the API request (written in JavaScript) at Zapier trigger configuration:

const options = {
  url: 'https://apps.1st-things-1st.com/api/v1/projects/',
  method: 'GET',
  headers: {
    'Accept': 'application/json',
    'Authorization': `Bearer ${bundle.authData.access_token}`
  },
  params: {
    'page': bundle.meta.page + 1  // <-- The custom line for pagination
  }
}

return z.request(options)
  .then((response) => {
    response.throwForStatus();
    const results = response.json;

    // You can do any parsing you need for results here before returning them

    return results;
  });

Final Words

For the v1 of Zapier integration, I didn't need any Zapier actions, so they are yet something to explore, experiment with, and learn about. But the Zapier triggers seem already pretty helpful and a big win compared to individual exports without this tool.

If you want to try the result, do this:

  • Create an account and a project at 1st things 1st
  • Prioritize something
  • Head to Zapier integrations and connect your prioritization project to a project of your favorite to-do list or project management app
  • Then click on "Export via Zapier" at 1st things 1st.

Cover photo by Anna Nekrashevich

2022-04-09

Generic Functionality without Generic Relations

When you have some generic functionality like anything commentable, likable, or upvotable, it’s common to use Generic Relations in Django. The problem with Generic Relations is that they create the relationships at the application level instead of the database level, and that requires a lot of database queries if you want to aggregate content that shares the generic functionality. There is another way that I will show you in this article.

I learned this technique at my first job in 2002 and then rediscovered it again with Django a few years ago. The trick is to have a generic Item model where every other autonomous model has a one-to-one relation to the Item. Moreover, the Item model has an item_type field, allowing you to recognize the backward one-to-one relationship.

Then whenever you need to have some generic categories, you link them to the Item. Whenever you create generic functionality like media gallery, comments, likes, or upvotes, you attach them to the Item. Whenever you need to work with permissions, publishing status, or workflows, you deal with the Item. Whenever you need to create a global search or trash bin, you work with the Item instances.

Let’s have a look at some code.

Items

First, I'll create the items app with two models: the previously mentioned Item and the abstract model ItemBase with the one-to-one relation for various models to inherit:

# items/models.py
import sys

from django.db import models
from django.apps import apps

if "makemigrations" in sys.argv:
    from django.utils.translation import gettext_noop as _
else:
    from django.utils.translation import gettext_lazy as _


class Item(models.Model):
    """
    A generic model for all autonomous models to link to.
    
    Currently these autonomous models are available:
    - content.Post
    - companies.Company
    - accounts.User
    """
    ITEM_TYPE_CHOICES = (
        ("content.Post", _("Post")),
        ("companies.Company", _("Company")),
        ("accounts.User", _("User")),
    )
    item_type = models.CharField(
        max_length=200, choices=ITEM_TYPE_CHOICES, editable=False, db_index=True
    )

    class Meta:
        verbose_name = _("Item")
        verbose_name_plural = _("Items")

    def __str__(self):
        content_object_title = (
            str(self.content_object) if self.content_object else "BROKEN REFERENCE"
        )
        return (
            f"{content_object_title} ({self.get_item_type_display()})"
        )

    @property
    def content_object(self):
        app_label, model_name = self.item_type.split(".")
        model = apps.get_model(app_label, model_name)
        return model.objects.filter(item=self).first()


class ItemBase(models.Model):
    """
    An abstract model for the autonomous models that will link to the Item.
    """
    item = models.OneToOneField(
        Item,
        verbose_name=_("Item"),
        editable=False,
        blank=True,
        null=True,
        on_delete=models.CASCADE,
        related_name="%(app_label)s_%(class)s",
    )

    class Meta:
        abstract = True

    def save(self, *args, **kwargs):
        if not self.item:
            model = type(self)
            item = Item.objects.create(
                item_type=f"{model._meta.app_label}.{model.__name__}"
            )
            self.item = item
        super().save()

    def delete(self, *args, **kwargs):
        if self.item:
            self.item.delete()
        super().delete(*args, **kwargs)

Then let's create some autonomous models that will have one-to-one relations with the Item. By "autonomous models," I mean those which are enough by themselves, such as posts, companies, or accounts. Models like types, categories, tags, or likes, wouldn't be autonomous.

Posts

Second, I create the content app with the Post model. This model extends ItemBase which will create the one-to-one relation on save, and will define the item_type as content.Post:

# content/models.py
import sys

from django.contrib.auth.base_user import BaseUserManager
from django.db import models
from django.contrib.auth.models import AbstractUser

if "makemigrations" in sys.argv:
    from django.utils.translation import gettext_noop as _
else:
    from django.utils.translation import gettext_lazy as _

from items.models import ItemBase


class Post(ItemBase):
    title = models.CharField(_("Title"), max_length=255)
    slug = models.SlugField(_("Slug"), max_length=255)
    content = models.TextField(_("Content"))

    class Meta:
        verbose_name = _("Post")
        verbose_name_plural = _("Posts")

Companies

Third, I create the companies app with the Company model. This model also extends ItemBase which will create the one-to-one relation on save, and will define the item_type as companies.Company:

# companies/models.py
import sys

from django.contrib.auth.base_user import BaseUserManager
from django.db import models
from django.contrib.auth.models import AbstractUser

if "makemigrations" in sys.argv:
    from django.utils.translation import gettext_noop as _
else:
    from django.utils.translation import gettext_lazy as _

from items.models import ItemBase


class Company(ItemBase):
    name = models.CharField(_("Name"), max_length=255)
    slug = models.SlugField(_("Slug"), max_length=255)
    description = models.TextField(_("Description"))

    class Meta:
        verbose_name = _("Company")
        verbose_name_plural = _("Companies")

Accounts

Fourth, I'll have a more extensive example with the accounts app containing the User model. This model extends AbstractUser from django.contrib.auth as well as ItemBase for the one-to-one relation. The item_type set at the Item model will be accounts.User:

# accounts/models.py
import sys

from django.db import models
from django.contrib.auth.base_user import BaseUserManager
from django.contrib.auth.models import AbstractUser

if "makemigrations" in sys.argv:
    from django.utils.translation import gettext_noop as _
else:
    from django.utils.translation import gettext_lazy as _

from items.models import ItemBase


class UserManager(BaseUserManager):
    def create_user(self, username="", email="", password="", **extra_fields):
        if not email:
            raise ValueError("Enter an email address")
        email = self.normalize_email(email)
        user = self.model(username=username, email=email, **extra_fields)
        user.set_password(password)
        user.save(using=self._db)
        return user

    def create_superuser(self, username="", email="", password=""):
        user = self.create_user(email=email, password=password, username=username)
        user.is_superuser = True
        user.is_staff = True
        user.save(using=self._db)
        return user


class User(AbstractUser, ItemBase):
    # change username to non-editable non-required field
    username = models.CharField(
        _("Username"), max_length=150, editable=False, blank=True
    )
    # change email to unique and required field
    email = models.EmailField(_("Email address"), unique=True)
    bio = models.TextField(_("Bio"))

    USERNAME_FIELD = "email"
    REQUIRED_FIELDS = []

    objects = UserManager()

Creating new items

I will use the Django shell to create several autonomous model instances and the related Items too:

>>> from content.models import Post
>>> from companies.models import Company
>>> from accounts.models import User
>>> from items.models import Item
>>> post = Post.objects.create(
...     title="Hello, World!",
...     slug="hello-world",
...     content="Lorem ipsum…",
... )
>>> company = Company.objects.create(
...     name="Aidas & Co",
...     slug="aidas-co",
...     description="Lorem ipsum…",
... )
>>> user = User.objects.create_user(
...     username="aidas",
...     email="aidas@example.com",
...     password="jdf234oha&6sfhasdfh",
... )
>>> Item.objects.count()
3

Aggregating content from all those relations

Lastly, here is an example of having posts, companies, and users in a single view. For that, we will use the Item queryset with annotations:

from django import forms
from django.db import models
from django.shortcuts import render
from django.utils.translation import gettext, gettext_lazy as _

from .models import Item


class SearchForm(forms.Form):
    q = forms.CharField(label=_("Search"), required=False)
    

def all_items(request):
    qs = Item.objects.annotate(
        title=models.Case(
            models.When(
                item_type="content.Post", 
                then="content_post__title",
            ),
            models.When(
                item_type="companies.Company", 
                then="companies_company__name",
            ),
            models.When(
                item_type="accounts.User",
                then="accounts_user__email",
            ),
            default=models.Value(gettext("<Untitled>")),
        ),
        description=models.Case(
            models.When(
                item_type="content.Post",
                then="content_post__content",
            ),
            models.When(
                item_type="companies.Company",
                then="companies_company__description",
            ),
            models.When(
                item_type="accounts.User", 
                then="accounts_user__bio",
                ),
            default=models.Value(""),
        ),
    )
    
    form = SearchForm(data=request.GET, prefix="search")
    if form.is_valid():
        query = form.cleaned_data["q"]
        if query:
            qs = qs.annotate(
                search=SearchVector(
                    "title",
                    "description",
                )
            ).filter(search=query)

    context = {
        "queryset": qs,
        "search_form": form,
    }
    return render(request, "items/all_items.html", context)

Final words

You can have generic functionality and still avoid multiple hits to the database by using the Item one-to-one approach instead of generic relations.

The name of the Item model can be different, and you can even have multiple such models for various purposes, for example, TaggedItem for tags only.

Do you use anything similar in your projects?

Do you see how this approach could be improved?

Let me know in the comments!


Cover picture by Pixabay

2021-11-09

17 Django Project Ideas that can Make a Positive Impact around You

17 Django Project Ideas that can Make a Positive Impact around You

For more than a decade, I was focused only on the technical part of website building with Django. In the process, I have built a bunch of interesting cultural websites. But I always felt that those sleepless nights were not worthy of the impact.

They say, "Don’t work hard, work smart!" I agree with that phrase, and for me it's not about working less hours. For me, it's working as much as necessary, but on things that matter most.

So after years of collecting facts about life, I connected the dots and came up with make-impact.org – a social donation platform, which became one of the most important long-term projects. All my planning goes around this project.

And I believe I am not the only programmer who sometimes feels that they want to make a positive impact with their skills. So I brainstormed 17 Django project ideas. You can choose one and realize it as a hobby project, open-source platform, startup, or non-profit organization; alone, with a team of developers, or collaborating with some non-technical people.

Idea #1: Low Qualification Job Search

The job market is pretty competitive, and not all people can keep up with the train. You could build a job search website for jobs that don't require high education or lots of working experience. It could be helpful for people with language barriers, harsh living conditions, or those who are very young or very old. You could build it for your city, region, or country.

Idea #2: Discounted Meals and Products

Get inspired from Too Good To Go and build a progressive web app for your city about discounted restaurant meals and shop products whose expiration date is close to the end, but they are still good to eat.

Idea #3: Personal Health Advisor and Tracker

Build a website for setting your personal health improvement goals and tracking the progress. For example, maybe one wants to start eating more particular vegetables every week, jogging daily, lose or gain weight, or get rid of unhealthy addictions. Let people choose their health goals and check in with each progressive step. Allow using the website anonymously.

Idea #4: Online Primary and Elementary School Materials

Some people don't have access to schools in general or miss some classes because of illnesses. You could build a global and open wiki-based primary and elementary school education website for children and adults. It should be translatable and localizable. It would also be interesting to compare the same subject teachings in different countries side-by-side.

Idea #5: Psychological Support for Women

You could build a website with a video chat providing psychological support to discriminated or violently abused women. The help could be given by professionals or emphatic volunteers. The technical part can be implemented using django-channels, WebSockets, and WebRTC.

Idea #6: Rain-harvesting Companies around the World

Rain harvesting is one of the available ways to solve the problem of the lack of drinking water. There could be a platform comparing rain-harvesting companies all around the world. What are the installation prices? What are the countries they are working with? How many people have they saved? This website would allow people to find the most optimal company to build a rain harvesting system for them.

Idea #7: Closest Electric Car Charging Stations

Use the Open Charge Map API and create a progressive web app that shows the nearest electric car charging station and how to get there.

Idea #8: Escrow-based Remote Job Search

As remote jobs are getting more and more popular, there is still a matter of trust between the employees and employers. "Will the job taker complete their job in a good quality?" "Will the company pay the employee on time?" There are Escrow services to fix this issue. These are third parties that take and hold the money until the job is done. You could build a remote job search website promoting the usage of Escrow.com or another escrow service provider.

Idea #9: Open Work Locations

You could build a website listing coworking spaces and cafes with free wifi in your city. It should include the map, price ranges, details if registration is required, and other information necessary for remote workers.

Idea #10: Most Admired Companies

There could be a social website listing the most admired companies to work for in your country. Companies could be rated by working conditions, salary equality, growth opportunities, work relations, and other criteria. Anyone could suggest such a company, and they would be rated by their current and former employees anonymously.

Idea #11: Tiny Houses

The cost of accommodation is a critical problem in many locations of the world. You could develop a website that lists examples of tiny houses and their building schemas and instructions.

Idea #12: Catalog of Recycled Products

You could work on a product catalog with links to online shops, selling things produced from collected plastic. For example, these sunglasses are made of plastic collected from the ocean. Where available, you could use affiliate marketing links.

Idea #13: Information for Climate-change Migrants

You could work on a website for climate-change migrants with information about getting registered, housing, education, and jobs in a new city or country with better climate conditions.

Idea #14: Fishes, Fishing, and Overfishing

Scrape parts of FishBase and create a website about fishes, fishing, and overfishing in your region or the world. Engage people about the marine world and inform them about the damage done by overfishing.

Idea #15: Plant Trees

Create an E-commerce shop or Software as a Service and integrate RaaS (Reforestation as a Service). Let a tree be planted for every sale.

Idea #16: Positive Parenting

Create a progressive web app about positive parenting. For inspiration and information check this article.

Idea #17: Constructive Forum

Create a forum with topic voting and automatic hate speech detection and flagging. For example, maybe you could use a combination of Sentiment analysis from text-processing.com and usage of profanity words to find negativity in forum posts.

It's your turn

I hope this post inspired you. If you decided to start a startup with one of those ideas, don't forget to do your research at first. What are the competitors in your area? What would be your unique selling point? Etc.

Also, it would be interesting to hear your thoughts. Which of the projects would seem to you the most crucial? Which of them would you like to work on?


Cover photo by Joshua Fuller

2021-11-06

How to Use Semantic Versioning for Shared Django Apps

How to Use Semantic Versioning for Shared Django Apps

When you are building websites with Django, there is no need to track their software versions. You can just have a stable branch in Git repository and update the production environment whenever it makes sense. However, when you create a Django app or package shared among various websites and maybe with multiple people, it is vital to keep track of the package versions.

The Benefits

Versioning allows you to identify a specific state of your package and has these benefits:

  • Developers can be aware of which package version works with their websites together flawlessly.
  • You can track which versions had which bugs or certain features when communicating with open-source communities or technical support.
  • In the documentation, you can clearly see which version of the software it is referring to.
  • When fixing bugs of a particular version, developers of the versioned package have a narrower scope of code to check at version control commits.
  • Just from the version number, it's clear if the upgrade will only fix the bugs or if it requires more attention to make your software compatible.
  • When talking to other developers about a particular package, you can clearly state what you are talking about (yes, developers talk about software versions from time to time 😅).

Semantic Versioning

The most popular versioning scheme is called semantic versioning. The version consists of three numbers separated by dots. Django framework is using it too. For example, the latest stable version at the time of writing is 3.2.9. In semantic versioning, the first number is the major version, the second is the minor version, and the third is a patch version: MAJOR.MINOR.PATCH.

  1. MAJOR version introduces backward incompatible features.
  2. MINOR version adds functionality that is backward compatible.
  3. PATCH version is for backward-compatible bug fixes.

There can also be some versioning outliers for alpha, beta, release candidates rc1, rc2, etc., but we will not cover them in this post.

By convention, the package's version is saved in its myapp/__init__.py file as __version__ variable, for example:

__version__ = "0.2.4"

In addition, it is saved in setup.py, README.md, CHANGELOG.md, and probably some more files.

Changelog

When you develop a Django app or another Python package that you will share with other developers, it is also recommended to have a changelog. Usually, it's a markdown-based document with the list of features, bugs, and deprecations that were worked on between specific versions of your package.

A good changelog starts with the "Unreleased" section and is followed by sections for each version in reverse order. In each of those sections, there are lists of changes grouped into categories:

  • Added
  • Changed
  • Deprecated
  • Removed
  • Fixed
  • Security

This could be the starting template for CHANGELOG.md:

Changelog
=========

All notable changes to this project will be documented in this file.

The format is based on [Keep a Changelog](https://keepachangelog.com/en/1.0.0/),
and this project adheres to [Semantic Versioning](https://semver.org/spec/v2.0.0.html).


[Unreleased]
------------


<!--
### Added
### Changed
### Deprecated
### Removed
### Fixed
### Security
-->

As the new version is released, it will replace the Unreleased section while creating a new Unreleased section above it. For example, this:

[Unreleased]
------------

### Added

- Logging the cookie consent choices in the database because of the legal requirements.

### Fixed

- Disabling the buttons while saving the Cookie Choices so that they are not triggered more than once with slow Internet connections.

would become this:

[Unreleased]
------------

[v0.2.0] - 2021-10-27
------------------

### Added

- Logging the cookie consent choices in the database because of the legal requirements.

### Fixed

- Disabling the buttons while saving the Cookie Choices so that they are not triggered more than once with slow Internet connections.

To keep track of the versions manually would be pretty tedious work, with the likelihood of forgetting one or more files or mismatching the version numbers. Gladly, there is a utility tool to do that for you, which is called bump2version.

Using bump2version

Installation

Install the bump2version utility to your virtual environment the standard way with pip:

(env)$ pip install bump2version

Preparation

In your package's __init__.py file, set the version to 0.0.0:

__version__ = "0.0.0"

Set the version to 0.0.0 in all other files, where the version needs to be mentioned, for example, README.md and setup.py.

Then create setup.cfg with the following content:

[bumpversion]
current_version = 0.0.0
commit = True
tag = True

[bumpversion:file:setup.py]
search = version="{current_version}"
replace = version="{new_version}"

[bumpversion:file:myapp/__init__.py]
search = __version__ = "{current_version}"
replace = __version__ = "{new_version}"

[bumpversion:file:README.md]
search = django_myapp-{current_version}-py2.py3-none-any.whl
replace = django_myapp-{new_version}-py2.py3-none-any.whl

[bumpversion:file:CHANGELOG.md]
search = 
    [Unreleased]
    ------------
replace = 
    [Unreleased]
    ------------
    
    [v{new_version}] - {utcnow:%%Y-%%m-%%d}
    ------------------

[bdist_wheel]
universal = 1

Replace "django_myapp" and "myapp" with your Django app there. If you have more files, mentioning the package version, make sure to have analogous version replacements in the setup.cfg.

Commit and push your changes to the Git repository.

Usage

Every time you want to create a new version, type this in the shell:

$ bump2version patch

or

$ bump2version minor

or

$ bump2version major

followed by the command to build the package:

$ python3 setup.py sdist bdist_wheel

As mentioned before, patch is for the bug fixes, minor is for backward-compatible changes, and major is for backward-incompatible changes.

The bump2version command will use the configuration at setup.cfg and will do these things:

  • It will increment the current version number depending on the parameter passed to it.
  • It will replace the old version with the new one in the setup.py, myapp/__init__.py, and README.md.
  • It will take care of correct versioning in the CHANGELOG.md.
  • Then, it will commit the changes and create a tag according to the pattern vMAJOR.MINOR.PATCH there.

Some further details

There are two things to note there.

First, in Markdown, there are two ways of setting the headings:

Changelog
=========

[Unreleased]
------------

is identical to

# Changelog

## [Unreleased]

Usually, I would use the second format for Markdown, but the replacement function in setup.cfg treats lines with the # symbol as comments, and escaping doesn't work either.

For example, this wouldn't work:

[bumpversion:file:CHANGELOG.md]
search = 
    ## [Unreleased]
replace = 
    ## [Unreleased]
    
    ## [v{new_version}] - {utcnow:%%Y-%%m-%%d}

If anybody knows or finds a simple solution with the shorter Markdown variation, let me know.

Second, instead of using setup.cfg, you can use .bumpversion.cfg, but that file is hidden, so I recommend sticking with setup.cfg.

Final words

You can see this type of semantic versioning configuration in the paid Django GDPR Cookie Consent app I recently published on Gumroad.

Happy programming!


Cover photo by Jacob Campbell

2021-04-05

Guest Post: Django Crispy Forms Advanced Usage Example

Guest Post: Django Crispy Forms Advanced Usage Example

This is a guest post by Serhii Kushchenko, Python/Django developer and data analyst. He is skillful in SQL, Python, Django, RESTful APIs, statistics, and machine learning.

This post aims to demonstrate the creation and processing of the large and complex form in Django using django-crispy-forms. The form contains several buttons that require executing different actions during the processing phase. Also, in the form, the number of rows and columns is not static but varies depending on some conditions. In our case, the set of rows and columns changes depending on the number of instances (columns) associated with the main object (data schema) in a many-to-one relationship.

The django-crispy-forms documentation includes a page Updating layouts on the go. That page is quite helpful. However, it does not contain any detailed example of a working project. IMHO such an example is much needed. I hope my project serves as a helpful addition to the official Django Crispy Forms documentation. Feel free to copy-paste the pieces of code that you find applicable.

Please see the full codebase here. It is ready for Heroku deployment.

Task

Suppose we have a database with information about people: name, surname, phone numbers, place of work, companies owned, etc. The task is not to process the data but to work with meta-information about that data.

Different users may need to extract varying information from the database. These users do not want to write and run SQL queries. They demand some simple and more visual solutions. The assignment is to make it possible for users to create the data schemas visually. In other words, to develop such a form and make it fully functioning.

Schema editing form

Using their schemas, users will be able to CRUD data in the database. However, these operations are beyond the scope of the current project.

Different columns can have their specific parameters. For example, integer columns have lower and upper bounds. It is necessary to develop functionality for editing those parameters for all types of columns. For that editing, forms are used that arise after clicking the "Edit details" button on the main form.

Moreover, we have to develop a form "Create new schema" and a page with a list of all available schemas.

Solution

Described below:

  1. Data models used.
  2. How the required forms are generated.
  3. Recognizing and handling the user-initiated state changes.

The task described above can be better solved using JavaScript together with Django forms. It would reduce the number of requests to the server and increase the speed of the application. So the user experience would improve. However, the project aimed to create an advanced example of working with Django Crispy Forms.

Here you can learn the following tricks:

  1. Compose a complex Django Crispy Form using the Layout, Row, Column, Fieldset, Field, and other available classes.
  2. During form generation, iterate over the Foreign Key related objects and create a form row for each of them.
  3. When it makes sense to use an abstract base class and when it doesn't.
  4. How to encode the required action and other data in the button name during its creation.
  5. Determine which button the user clicked and implement the analog of switch-case statement to perform the required action.
  6. Automatically populate the newly generated form with the request.POST data if you want and if that data is available.
  7. Validation of user-entered data (phone number) using a regular expression.
  8. If you have many similar models, use metaprogramming to generate ModelForm classes for those models without violating the DRY principle.

Models

According to the task, the number of columns in the schemas can be different. The users add new columns and delete existing columns. Also, they can change the type and order of columns. The columns and schemas have a many-to-one relationship that is described using the Foreign Key in Django models.

The picture shows that every schema has its name, 'Column separator' field, and 'String character' field. Also, it would be nice to save the date of the last schema modification. The following code from schemas\models.py file is pretty simple.

INTEGER_CH = "IntegerColumn"
FULLNAME_CH = "FullNameColumn"
JOB_CH = "JobColumn"
PHONE_CH = "PhoneColumn"
COMPANY_CH = "CompanyColumn"
COLUMN_TYPE_CHOICES = [
    (INTEGER_CH, "Integer"),
    (FULLNAME_CH, "Full Name"),
    (JOB_CH, "Job"),
    (PHONE_CH, "Phone"),
    (COMPANY_CH, "Company"),
]

DOUBLE_QUOTE = '"'
SINGLE_QUOTE = "'"
STRING_CHARACTER_CHOICES = [
    (DOUBLE_QUOTE, 'Double-quote(")'),
    (SINGLE_QUOTE, "Single-quote(')"),
]

COMMA = ","
SEMICOLON = ";"
COLUMN_SEPARATOR_CHOICES = [(COMMA, "Comma(,)"), (SEMICOLON, "Semicolon(;)")]


class DataSchemas(models.Model):

    name = models.CharField(max_length=100)
    column_separator = models.CharField(
        max_length=1,
        choices=COLUMN_SEPARATOR_CHOICES,
        default=COMMA,
    )
    string_character = models.CharField(
        max_length=1,
        choices=STRING_CHARACTER_CHOICES,
        default=DOUBLE_QUOTE,
    )
    modif_date = models.DateField(auto_now=True)

    def get_absolute_url(self):
        return reverse("schema_add_update", args=[str(self.id)])

Each column has a name, type, and order. All of these fields are in the base SchemaColumn(models.Model) class. This class cannot be abstract because in such a case, the code schema.schemacolumn_set.all() would not work.

Columns of type integer, first and last name, job, company, and phone number are implemented as classes derived from the base class SchemaColumn.

class SchemaColumn(models.Model):
    name = models.CharField(max_length=100)
    schema = models.ForeignKey(DataSchemas, on_delete=models.CASCADE)
    order = models.PositiveIntegerField()

    class Meta:
        unique_together = [["schema", "name"], ["schema", "order"]]

    def save(self, *args, **kwargs):
        self.validate_unique()
        super(SchemaColumn, self).save(*args, **kwargs)


class IntegerColumn(SchemaColumn):
    range_low = models.IntegerField(blank=True, null=True, default=-20)
    range_high = models.IntegerField(blank=True, null=True, default=40)


class FullNameColumn(SchemaColumn):
    first_name = models.CharField(max_length=10, blank=True, null=True)
    last_name = models.CharField(max_length=15, blank=True, null=True)


class JobColumn(SchemaColumn):
    job_name = models.CharField(max_length=100, blank=True, null=True)


class CompanyColumn(SchemaColumn):
    company_name = models.CharField(max_length=100, blank=True, null=True)


class PhoneColumn(SchemaColumn):
    phone_regex = RegexValidator(
        regex=r"^\+?1?\d{9,15}$",
        message="Phone number must be entered in the format: '+999999999'. Up to 15 digits allowed.",
    )
    phone_number = models.CharField(
        validators=[phone_regex], max_length=17, blank=True, null=True
    )  # validators should be a list

Forms

The schema editing form is quite complex. We do not use the Django built-in ModelForm class here because it is not flexible enough. Our class DataSchemaForm is a derivative of the forms.Form class. Of course, django-crispy-forms was very helpful and even essential.

from crispy_forms.layout import (
    Layout,
    Submit,
    Row,
    Column,
    Fieldset,
    Field,
    Hidden,
    ButtonHolder,
    HTML,
)

The type of column in the form depends on the class of the column. How to determine that class? The problems can arise if we use the built-in isinstance() function for derived classes such as our various column types. The following code demonstrates how the subclass check was implemented in the forms.py file when generating the form.

INTEGER_CH = "IntegerColumn"
FULLNAME_CH = "FullNameColumn"
JOB_CH = "JobColumn"
PHONE_CH = "PhoneColumn"
COMPANY_CH = "CompanyColumn"
COLUMN_TYPE_CHOICES = [
    (INTEGER_CH, "Integer"),
    (FULLNAME_CH, "Full Name"),
    (JOB_CH, "Job"),
    (PHONE_CH, "Phone"),
    (COMPANY_CH, "Company"),
]

subclasses = [
    str(subclass).split(".")[-1][:-2].lower()
    for subclass in SchemaColumn.__subclasses__()
]

# yes, somewhat redundant
column_type_switcher = {
    "integercolumn": INTEGER_CH,
    "fullnamecolumn": FULLNAME_CH,
    "jobcolumn": JOB_CH,
    "companycolumn": COMPANY_CH,
    "phonecolumn": PHONE_CH,
}

column_type_field_name = "col_type_%s" % (column.pk,)
self.fields[column_type_field_name] = forms.ChoiceField(
    label="Column type", choices=COLUMN_TYPE_CHOICES
)
for subclass in subclasses:
    if hasattr(column, subclass):
        self.fields[column_type_field_name].initial = [
            column_type_switcher.get(subclass)
        ]
        break

How new schemas are created

The function that generates the schema editing form may get the primary key of the existing schema. If such a key is not available, then the function creates a new schema and its first column. After that, the user can change the parameters of the schema, as well as add new columns.

if schema_pk:
    schema = DataSchemas.objects.get(pk=schema_pk)
else:
    # no existing schema primary key passed from the caller,
    # so create new schema and its first column
    # with default parameters
    schema = DataSchemas.objects.create(name="New Schema")
    int1 = IntegerColumn.objects.create(
        name="First Column",
        schema=schema,
        order=1,
        range_low=-20,
        range_high=40,
    )

self.fields["name"].initial = schema.name
self.fields["column_separator"].initial = schema.column_separator
self.fields["string_character"].initial = schema.string_character

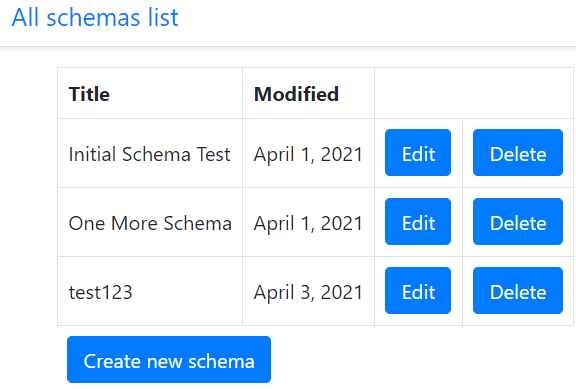
In addition to the schema editing form, the application also contains a list of all created schemas.

All schemas list

There is nothing special about that page, so I will not describe it in detail here. Pleas see the full code and templates at https://github.com/s-kust/django-advanced-forms.

Requests processing

The picture shows that the schema editing form contains several types of buttons:

  • Submit form
  • Add new column
  • Delete column
  • Edit column details

We need to determine which button the user pressed and perform the required action.

During the form creation, the required action is encoded in the names of all the buttons. Also, the column primary key or schema primary key is encoded there. For example, delete_btn = 'delete_col_%s' % (column.pk,) or submit_form_btn = 'submit_form_%s' % (schema.pk,).

The name of the button can be found in the request.POST data only if the user has pressed that button. The following code from the views.py file searches for the button name in the request.POST data and calls the required function. A well-known method is used to implement the Python analog of switch-case statement.

btn_functions = {
    "add_new_col": process_btn_add_column,
    "delete_col": process_btn_delete_column,
    "edit_col": process_btn_edit_column_details,
    "submit_form": process_btn_submit_form,
    "save_column_chng": process_btn_save_chng_column,
}
btn_pressed = None

# source of key.startswith idea - https://stackoverflow.com/questions/13101853/select-post-get-parameters-with-regular-expression
for key in request.POST:
    if key.startswith("delete_col_"):
        btn_pressed = "delete_col"
    if key.startswith("edit_col_"):
        btn_pressed = "edit_col"
    if key.startswith("add_column_btn_"):
        btn_pressed = "add_new_col"
    if key.startswith("submit_form_"):
        btn_pressed = "submit_form"
    if key.startswith("save_column_chng_btn_"):
        btn_pressed = "save_column_chng"

    if btn_pressed is not None:
        func_to_call = self.btn_functions.get(btn_pressed)
        self.pk, form = func_to_call(self, key, form_data=request.POST)
        break

Editing parameters of different types of columns

Different types of columns have their specific parameters. For example, integer columns have lower and upper bounds. Phone columns have the phone number field that requires validation before saving. The number of different types of columns can increase over time.

How to handle the Edit Details button click? The straightforward solution is to make individual ModelForm classes for each type of column. However, it would violate the DRY principle. Perhaps, in this case, the use of metaprogramming is justified.

def get_general_column_form(self, model_class, column_pk):
    class ColumnFormGeneral(ModelForm):
        def __init__(self, *args, **kwargs):
           super(ColumnFormGeneral, self).__init__(*args, **kwargs)
           self.helper = FormHelper(self)
           save_chng_btn = "save_column_chng_btn_%s" % (column_pk,)
           self.helper.layout.append(Submit(save_chng_btn, "Save changes"))

        class Meta:
           model = model_class
           exclude = ["schema", "order"]

   return ColumnFormGeneral       

First, the type of column is determined using its primary key. After that, the get_general_column_form function is called. It returns the customized ModelForm class. Next, an instance of that class is created and used.

column = get_object_or_404(SchemaColumn, pk=column_pk)
for subclass in self.subclasses:
    if hasattr(column, subclass):
        column_model = apps.get_model("schemas", subclass)
        column = get_object_or_404(column_model, pk=column_pk)
        form_class = self.get_general_column_form(column_model, column_pk)
        form = form_class(
            initial=model_to_dict(
                column, fields=[field.name for field in column._meta.fields]
            )
        )
        break

Handling of the column type change

The user may change the type of one or several columns. If it happens, it means that the class of these columns has changed. Here, it is not enough to change the value of some attribute of the object. We have to delete the old object and create a new object belonging to the new class instead. How do we handle it:

  1. First, a form is generated using the schema's primary key.
  2. Then, in the newly created form, the data from the database is replaced with the request.POST data, if that data is available. It happens automatically.
  3. In the next step, the form is validated. For that, we have to call the form.is_valid() method explicitly.
  4. If the validation is successful, then we process every column of the schema. For each column, its type from the database is compared with its type from the form. It means that its database type is compared with its request.POST type. If these types differ, the old column is deleted, and a new one is created instead.
# elem is a 'Submit Form' button that the user pressed.
# schema primary key is encoded in its name
# first, let's decode it
self.pk = [int(s) for s in elem.split("_") if s.isdigit()][0]

# form_data is request.POST
form = DataSchemaForm(form_data, schema_pk=self.pk)
if form.is_valid():
    schema = get_object_or_404(DataSchemas, pk=self.pk)
    schema.name = form.cleaned_data["name"]
    schema.column_separator = form.cleaned_data["column_separator"]
    schema.string_character = form.cleaned_data["string_character"]
    schema.save()

    # the following code is in the save_schema_columns(self, schema, form) function
    schema_columns = schema.schemacolumn_set.all()
    for column in schema_columns:
        column_name_field_name = "col_name_%s" % (column.pk,)
        column_order_field_name = "col_order_%s" % (column.pk,)
        column_type_field_name = "col_type_%s" % (column.pk,)

        type_form = form.cleaned_data[column_type_field_name]
        type_changed = False
        for subclass in self.subclasses:
            if hasattr(column, subclass):
                type_db = self.column_type_switcher.get(subclass)
                if type_db != type_form:
                    new_class = globals()[type_form]
                    new_column = new_class()
                    new_column.name = form.cleaned_data[column_name_field_name]
                    new_column.order = form.cleaned_data[column_order_field_name]
                    new_column.schema = schema
                    column.delete()
                    new_column.save()
                    type_changed = True
                    break
        if not type_changed:
            column.name = form.cleaned_data[column_name_field_name]
            column.order = form.cleaned_data[column_order_field_name]
            column.save()

Final Words

I hope this post serves as a helpful addition to the official Django Crispy Forms documentation. Feel free to copy-paste the pieces of code that you find applicable. Also, write comments and share your experience of using Django Crispy Forms.


Cover photo by Juan Pablo Malo.